


Replace sky in Lightroom to transform dull or blown-out skies into stunning visuals. With Lightroom’s advanced tools, photographers can enhance their images seamlessly. This guide offers a clear, step-by-step process to master sky replacement and create captivating edits that impress every viewer.
Replace Sky in Lightroom: Why the Sky Matters in Landscape Photography
The sky isn’t just background filler; it’s a vital compositional element in landscape photography. A dramatic sky with rich colors and dynamic clouds can transform an image, adding depth, emotion, and visual balance.
For photographers, mastering the ability to replace the sky in Lightroom is more than just a technical skill—it’s a creative advantage. This technique allows you to match the mood of the sky to the rest of your image or even enhance it to better align with your artistic vision. Whether you’re aiming for a sunset glow or a stormy vibe, sky replacement provides endless opportunities to perfect your shots.
Preparing for the Edit
Proper preparation is key to achieving a seamless sky replacement. Here are the essential steps:
- Start with High-Quality Images
Always use high-resolution files, preferably in RAW format. RAW files retain the most detail and color information, giving you greater flexibility during post-processing. - Ensure Your Lightroom Version Is Updated
Adobe frequently updates Lightroom with new features and improved tools. To access the latest sky selection and masking features, ensure you’re using the most current version of the software. - Gather Suitable Replacement Skies
Collect a library of replacement sky images that match the mood you’re aiming for. You can capture your own skies or download high-quality ones from online resources. Look for skies with lighting and tones that complement the rest of your image.
Replace Sky in Lightroom: A Step-by-Step Guide
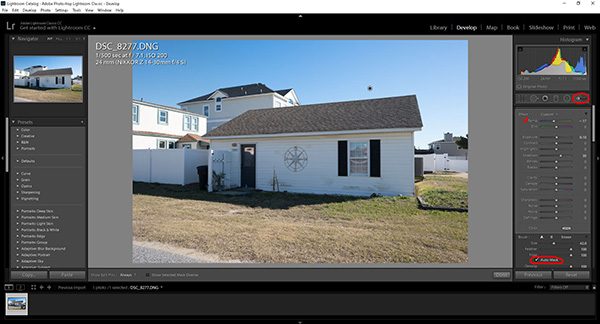
Using the Masking Tool
Lightroom’s Masking Tool makes isolating and replacing the sky straightforward:
- Open your image in Lightroom and navigate to the Develop module.
- Use the Masking Tool and select Sky. Lightroom’s AI will automatically detect and mask the sky for you.
- Once the sky is selected, adjust sliders like Exposure, Contrast, and Highlights to prepare it for replacement.
Replace Sky in Lightroom: Using Photoshop for Advanced Edits
In some cases, Lightroom’s tools may not be enough to achieve the perfect look. Here’s how to seamlessly transition to Photoshop:
- Right-click your image in Lightroom and select Edit in Photoshop.
- Use Photoshop’s advanced layering tools to replace the sky. Import your replacement sky as a new layer and use the Blend If sliders for seamless integration.
- Once finished, save the image, and it will automatically sync back to Lightroom for further refinement.
Replace Sky in Lightroom: Pro Tips for Natural and Professional Results
- Match the Lighting
Ensure the replacement sky matches the lighting conditions in the rest of the scene. For example, if your image features warm sunset tones, avoid adding a bright midday sky. - Use Color Grading for Cohesion
After replacing the sky, use Lightroom’s Color Grading panel to adjust the tones and colors of the foreground so it harmonizes with the new sky. - Pay Attention to Edges
Blending the edges where the sky meets the foreground is critical. Use tools like Feathering and the Dehaze slider to avoid harsh transitions.
Common Mistakes and How to Avoid Them
1. Overly Sharp Transitions
A sharp edge between the sky and foreground can make the replacement look artificial. Always use Feathering to soften these edges.
2. Mismatched Colors and Lighting
A common error is choosing a sky that doesn’t match the original scene’s lighting. Avoid this by carefully analyzing the lighting direction and temperature in both the sky and the rest of the image.
3. Overprocessing
Overuse of saturation or contrast can make the edit look unnatural. Aim for subtle adjustments that enhance the image without overpowering it.
Conclusion: Transform Your Photos with Sky Replacement
Replacing the sky in Lightroom is a game-changing skill for photographers looking to enhance their work. By following the steps outlined in this guide—preparing your files, using the Masking Tool, and integrating Photoshop when necessary—you can achieve seamless and professional results.
Sky replacement isn’t just about fixing a problem; it’s an opportunity to elevate your artistic vision. With practice, you’ll be able to create images that leave a lasting impression.
About Alida’s Real Estate Photo Editing Services
Looking for expert photo editing for your real estate images? At Alida, we specialize in enhancing property photos to make them stand out. Whether it’s replacing skies, improving lighting, or refining details, our team delivers results that captivate potential buyers.
Contact us today at photonews121@gmail.com to learn more about how we can transform your real estate photos into stunning visuals that sell!