


Real estate photography is an essential tool for showcasing properties in their best light. One of the most effective ways to enhance the visual appeal of a home is by adding fire to a fireplace in your photos. Whether you are a seasoned real estate photographer, marketer, or interior designer, creating a warm, inviting atmosphere can make your images stand out and attract potential buyers. In this article, we will explore the importance of photo editing in creating a cozy atmosphere and provide a step-by-step guide on how to add fire to a fireplace in Photoshop.
The Importance of Photo Editing to Create a Cozy, Inviting Atmosphere
A key element in real estate photography is ensuring the home appears welcoming and comfortable. Photo editing allows you to adjust lighting, enhance colors, and add elements such as fire to create a sense of warmth. A fireplace, especially in colder months, can transform a cold, uninviting space into a cozy, homey area. The warmth of a fire in the image can evoke positive emotions, making viewers feel more connected to the space. This emotional response can be crucial in a real estate transaction, as it often helps buyers envision themselves living in the space.
Preparing to Add Fire to a Fireplace
Before diving into the technical process of adding fire to a fireplace in Photoshop, it’s important to start with the right image. A high-quality base image will make the final result more convincing and professional. Here’s how to prepare your image:
1. Choosing the Right Image for Editing
Choose an image that already features a fireplace or has space where a fire can be added. Make sure the image has good lighting, clear details, and a balanced composition. If the fireplace appears dull or lacks a natural focal point, adding fire can bring life and focus to the image.
2. Working with Images That Have a Fireplace or Space for Adding Fire
Ensure that the fireplace is visible and easily editable. The space should be large enough to allow for the addition of fire without appearing cramped or unnatural. Consider the perspective of the room; if the fireplace is facing a window, the fire might need adjustments to match the light source outside.
How to Add Fire to a Fireplace in Photoshop
Once you have prepared your image, you can start adding fire to your fireplace. Here’s a step-by-step guide on how to do this using Photoshop:
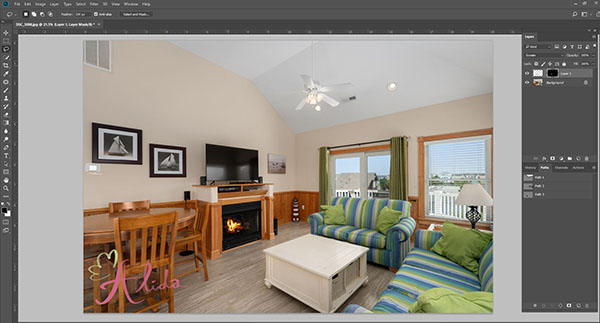
Step 1: Open the Image in Photoshop
First, open your chosen image in Photoshop. Clean up the image by removing any unnecessary elements or distractions. You can use the Crop Tool or the Clone Stamp Tool to fix minor issues. Preparing the background will ensure that the fire you add will integrate smoothly into the image.
Step 2: Find the Right Fire Image
For the fire itself, you can either photograph your own fire or find high-quality fire images online. Websites like Unsplash or Pixabay offer free, high-resolution images that you can use for this purpose. Ensure the fire image is well-lit and matches the color temperature of the room. The more realistic your fire image, the better the final result will look.
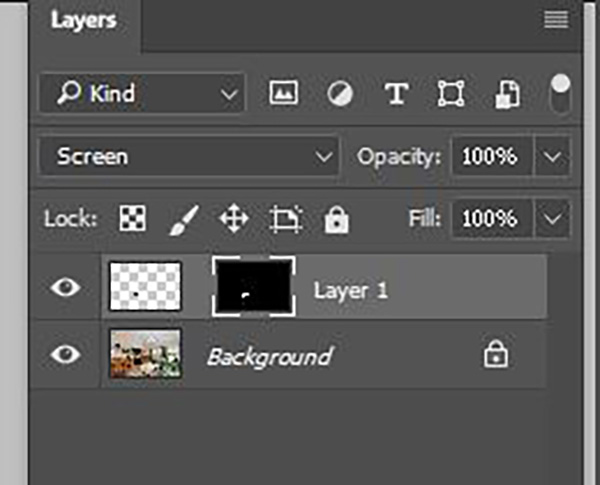
Step 3: Create a New Layer and Add the Fire Image
Once you have your fire image, create a new layer in Photoshop. Place the fire image over the fireplace and resize it so it fits naturally within the frame. Use the Free Transform tool (Ctrl + T) to adjust the size and position of the fire until it looks right.
Step 4: Adjust the Color and Brightness of the Fire
Next, match the color and brightness of the fire with the rest of the image. If the room is well-lit, the fire should have a warm glow. Use the Hue/Saturation and Levels adjustment layers to tweak the fire’s appearance. Ensure the fire doesn’t overpower the rest of the scene but complements the overall ambiance.
Step 5: Use Layer Masks and Feathering
To make the fire blend naturally with the scene, use a Layer Mask to hide any unwanted areas of the fire. Feather the mask to soften the edges, so the transition between the fire and the surrounding areas is smooth and realistic.
Additional Tips and Techniques
Enhancing the realism of the fire is key to creating a convincing image. Here are a few more tips to perfect your edits:
- Using Lighting Effects to Enhance the Realism of the Fire
Photoshop’s Lighting Effects filter can add depth and dimension to the fire. By adjusting the intensity and angle of the light, you can make the fire look more natural and cast realistic shadows in the room. - Adding Shadows to Create Depth in the Image
Shadows help create depth and make the fire appear more integrated into the scene. Use the Brush Tool with a soft, low opacity to paint in subtle shadows around the fireplace and furniture, making the fire appear as if it’s affecting the room’s lighting. - Creating Reflections on Surfaces Like Mirrors or Glass
If the room features reflective surfaces like mirrors or glass tables, adding reflections of the fire can enhance the image’s realism. Use a duplicate layer of the fire, invert it, and adjust the opacity to create the reflection effect.
How Can I Add Fire to a Photo Without a Fireplace?
If your photo doesn’t have a fireplace, you can still add a fire element. In such cases, you may need to add a fireplace first by using stock images or designing one digitally. Afterward, follow the same steps to integrate fire into the scene.
Does Photoshop Have an Automatic Tool for Creating Fire?
While Photoshop doesn’t have a one-click tool for creating fire, the process of adding fire is fairly straightforward once you have the right resources. Using a combination of high-quality fire images, Layer Masks, and lighting adjustments, you can create a realistic fire effect manually.
How Can I Make the Fire Look More Natural in My Photo?
To make the fire look more natural, pay attention to lighting, color matching, and shadows. Fire generates warm light, so ensure the fire adds a natural glow to the surrounding elements. Adjust the fire’s color and brightness to match the existing light sources in the room for a more realistic effect.
Conclusion
Adding fire to a fireplace in real estate photos can significantly enhance the visual appeal of a property. By following these simple steps in Photoshop, you can create inviting, warm images that attract potential buyers. Remember to practice and experiment with different techniques to perfect your skills. Share your results and ask questions in the comments for further tips.
If you need professional real estate photo editing services, feel free to reach out to Alida. With years of experience in photo editing, we specialize in creating stunning images that help sell properties faster. Contact us at photonews121@gmail.com for more information.