Resizing images is crucial for anyone managing digital content. Properly resized images optimize SEO, enhance load speed, and maintain a polished look. This guide will show you how to resize images in Photoshop step by step, highlighting why it’s the best tool for the job.
Why Photoshop is the Best Choice to Resize Images in Photoshop
Adobe Photoshop is renowned for its versatility and precision. It’s a favorite among professionals for several reasons:
- Advanced Editing Features: Photoshop offers robust tools for resizing, cropping, and editing images without compromising quality.
- Precision Control: It allows users to adjust image dimensions, resolution, and compression with pinpoint accuracy.
- Batch Processing: Photoshop makes resizing multiple images simultaneously a breeze, saving time for photographers and content creators.
Whether you’re preparing images for a website, social media, or print, Photoshop ensures high-quality results.
Step-by-Step Guide to Resizing Images in Photoshop

Step 1: Open the Image in Photoshop
- Launch Photoshop and open your image by navigating to File > Open.
- Make sure your file format is supported (e.g., JPEG, PNG, PSD).
Step 2: Access the Resize Feature
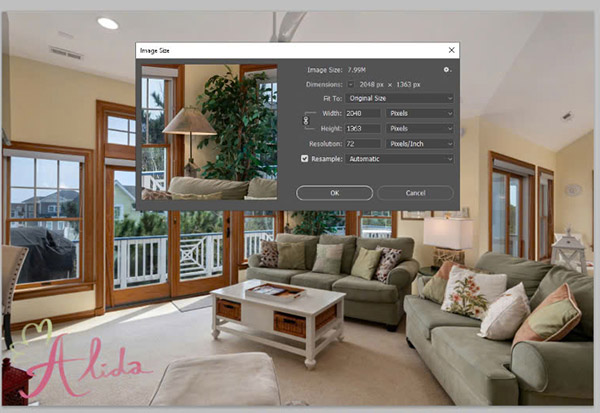
- Go to Image > Image Size to bring up the resize dialog box.
- Here, you can view and modify dimensions such as Width, Height, and Resolution.
Step 3: Adjust the Image Size
- Enter the desired dimensions for your image. Enable the Constrain Proportions option to maintain the aspect ratio and prevent distortion.
- Set the resolution to 72 PPI for images intended for the web. For print, use a higher resolution, such as 300 PPI, to ensure sharpness.
Step 4: Save the Resized Image
- Save your resized image via File > Save As, choosing the format that suits your needs.
- JPEG: is perfect for web use, providing an optimal balance between image quality and file size.
- PNG: Best for images requiring transparency.
- Optimize the file size by adjusting compression settings to maintain quality while reducing file size.
Tips for Resizing Images Effectively
- Convert to Smart Objects: Before resizing, convert your image layer to a Smart Object. This prevents permanent quality loss during transformations.
- Batch Resize: If you have a folder of images to resize, use Photoshop’s Batch Processing feature (File > Automate > Batch) to save time and effort.
Common Mistakes When You Resize Images in Photoshop and How to Avoid Them
- Distorted Images: Always enable the Constrain Proportions checkbox in the resize dialog box to avoid stretched or squished images.
- Pixelation: Avoid enlarging small, low-resolution images beyond their original dimensions, as this can lead to visible pixelation.
- Over-Compression: Be cautious with compression settings when saving images, as excessive compression can degrade quality.
Benefits of Resizing Images Properly
- SEO Optimization: Properly resized images reduce file size, enabling faster page load times and better rankings on search engines.
- Enhanced User Experience: Visitors appreciate a fast-loading website with crisp, well-sized visuals.
- Preservation of Visual Quality: Resizing while maintaining aspect ratios ensures your images look professional and appealing.
Q1: How can I resize multiple images at once in Photoshop?
Use Photoshop’s Batch Processing feature. Navigate to File > Automate > Batch, select the folder containing your images, and define the resize parameters to process multiple images in one go.
Q2: What if I don’t have Photoshop? Are there alternatives?
Yes! You can use free tools like GIMP or Canva, or online platforms such as TinyPNG and PicResize for basic resizing tasks.
Q3: Does resizing an image affect its quality?
Resizing can impact quality if not done correctly. Always use high-resolution images, maintain aspect ratios, and set appropriate resolution values to minimize quality loss.
Q4: What’s the best resolution for web images?
A resolution of 72 PPI is standard for web images, balancing quality and page load speed.
Q5: Can I resize an image without cropping?
Absolutely. By maintaining the aspect ratio in the Image Size dialog box, you can resize an image without losing any part of it.
Conclusion
Resizing images in Photoshop is a straightforward yet powerful technique that enhances website performance, user experience, and visual quality. With the steps outlined above, you can confidently resize your images while maintaining their professional appearance.
If you’re in the real estate industry and need expertly edited property photos, Alida Photo Editing Services can help. We specialize in high-quality real estate image editing to make your listings stand out. Contact us at photonews121@gmail.com to elevate your visual content today!


