


Achieving the perfect exposure in photography can be challenging, especially when capturing real estate or landscape photos. Whether you’re just starting out or are an experienced photographer, learning how to Photoshop blend multiple exposures can help you produce stunning images with enhanced detail. This guide will take you through the process of blending multiple exposures in Photoshop, explaining its importance, providing a step-by-step tutorial, and offering expert tips to improve your editing workflow.
Photoshop Blend Multiple Exposures in Real Estate & Landscape
Blending exposures is crucial in both real estate and landscape photography. In real estate photography, the goal is to capture both the interior and exterior of a building in one shot. This often means balancing the bright outdoors with the darker interior space. Without blending, you’ll either end up with overexposed windows or underexposed rooms, both of which detract from the overall quality of the photo.
For landscape photographers, blending exposures helps to preserve details in both the bright sky and the dark foreground, especially during sunrise or sunset shoots. This technique allows photographers to overcome the limitations of their camera’s dynamic range and produce images with rich detail across all areas.
Photoshop is one of the most powerful tools for this process. It offers precise control over every step, from selecting the right exposures to fine-tuning the final image, making it the go-to software for professional photographers.
What Does Blending Multiple Exposures Mean?
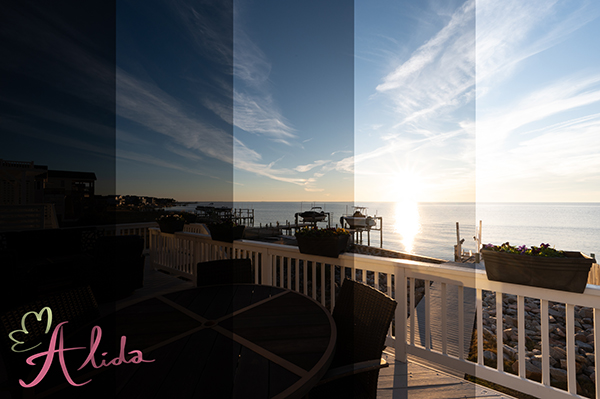

Blending multiple exposures is the process of combining two or more photographs taken at different exposure settings into one image. Typically, this involves using one photo with a proper exposure for the bright areas (such as windows or the sky) and another for the darker areas (such as the interior or shadows).
The reason this technique is necessary is simple: digital cameras have a limited dynamic range. They can’t always capture details in both very bright and very dark areas of a scene at the same time. By blending exposures, you can overcome this limitation and create an image with well-exposed highlights, mid-tones, and shadows.
Preparing for Exposure Blending in Photoshop
Before diving into the blending process, it’s essential to prepare your files correctly.
- Select the Right Photos: Choose photos with varying exposure levels. You’ll need an underexposed shot, a properly exposed shot, and an overexposed shot.
- Organize Your Files: Organize your images in a folder so that they’re easy to access when you import them into Photoshop.
- Set Up Your Workspace: Open Photoshop and set up your workspace. Make sure you have the necessary tools available, such as the Layers panel, Masks, and the Brush tool, to make your editing process smooth and efficient.
Step-by-Step Guide to Photoshop Blend Multiple Exposures
Step 1: Import and Stack the Exposures Start by importing all of your exposures into Photoshop. To accomplish this, navigate to File > Scripts > Load Files into Stack. Select the images you want to blend and click OK. Photoshop will place each exposure on a separate layer in the Layers panel.
Step 2: Create Layer Masks Each layer should have a corresponding layer mask. The layer mask allows you to hide or reveal parts of each exposure without permanently altering the original image. To create a layer mask, select a layer and click the “Add Layer Mask” button at the bottom of the Layers panel. This will add a white mask to the layer, revealing the entire image.
Step 3: Use the Brush Tool to Blend Now comes the fun part. Select the Brush tool and set it to a soft, low-opacity setting. With the layer mask selected, begin painting over areas that need to blend smoothly. For example, paint over areas where the exposure transition looks harsh, such as where a bright sky meets a darker foreground. By painting with black on the mask, you can hide parts of the image, revealing the underlying layers for a more natural blend.
Step 4: Adjust Color and Detail Once you’ve blended the exposures, it’s time to adjust the colors and fine-tune the details. Use the Levels, Curves, or Hue/Saturation adjustment layers to ensure that the colors match across the image and that the highlights and shadows are balanced.
Step 5: Export the Final Image After you’re satisfied with the result, it’s time to export the image. Go to File > Export > Export As, and select the appropriate format and resolution for your needs. If you’re working for print, make sure to choose a high-resolution setting; for online use, a lower resolution will suffice.
Expert Tips for Blending Multiple Exposures
- Choose the Right Exposure Bracketing: When shooting multiple exposures, ensure that your photos are taken with different exposure settings, but not so extreme that the blending process becomes difficult.
- Use Layer Masks with Precision: The key to seamless blending is careful use of the layer mask. Don’t rush the process—take time to fine-tune the edges of your masked areas.
- Avoid Overuse of HDR: While HDR software can automate the blending process, it often produces unnatural results. Blending manually in Photoshop gives you more control and allows for a more natural look.
Alternative Tools to Photoshop Blend Multiple Exposures
While Photoshop is the most popular tool for blending exposures, there are other options available:
- Lightroom: For photographers who prefer a simpler interface, Lightroom offers basic exposure blending capabilities through its HDR merge function.
- Aurora HDR: Specially designed for blending HDR images, this software provides powerful tools to merge exposures with minimal effort.
Conclusion
Mastering Photoshop blending of multiple exposures is crucial for photographers, especially in real estate and landscape photography. Following the steps in this guide will help you create high-quality images with balanced exposures. Practice and experimentation will refine your skills.
For enhanced real estate photos, Alida offers expert editing services. Contact us at photonews121@gmail.com for more details or to book our services.