


In the field of real estate photography, producing visually accurate images is essential for attracting potential buyers. However, lens distortion—an optical problem that warps straight lines and alters perspective—poses a common challenge, especially when using wide-angle lenses often employed in real estate photos. This distortion can make spaces appear unnatural or misrepresent property features, significantly reducing a listing’s appeal.
This article explores the different types of lens distortion, their causes, and effective methods for correcting them with Adobe Lightroom and Photoshop. Armed with this knowledge, photographers can create polished, distortion-free real estate photos that enhance their listings.
Understanding Lens Distortion in Real Estate Photos

Lens distortion in real estate photography stems from imperfections in lens design and the angle at which an image is captured. It can be categorized into two main types:
- Optical Distortion: This results directly from the lens design and varies by lens type.
- Perspective Distortion: This occurs due to the camera angle, especially when capturing tall buildings or interiors from extreme angles.
Among the most prevalent types of distortion encountered in real estate photography are barrel, pincushion, mustache, and keystone distortions.
Types of Lens Distortion Affecting Real Estate Photos
- Barrel Distortion: This distortion causes straight lines to curve outward, creating a bulging effect. It is commonly associated with ultra-wide-angle lenses, which are often utilized to capture expansive rooms or larger properties.
- Pincushion Distortion: In contrast to barrel distortion, pincushion distortion makes straight lines curve inward. While less common in real estate photography, it can still arise, particularly with telephoto lenses.
- Mustache Distortion: This type combines elements of both barrel and pincushion distortion, resulting in an uneven, wavy curve. Though it is less frequently encountered, it may occur with certain lenses.
- Keystone Distortion (Perspective Distortion): This distortion manifests when the camera is tilted upward or downward, making buildings appear to lean either backward or forward. It is a typical issue when photographing tall structures or interiors from steep angles.
Causes of Distortion in Real Estate Photos
- Lens Choice: Ultra-wide and fisheye lenses, often employed in real estate photography to capture expansive spaces, are particularly susceptible to barrel and pincushion distortions.
- Camera Angle and Position: Significant upward or downward tilting of the camera can result in keystone distortion, disrupting the natural alignment of vertical lines.
- Physical Constraints: In confined spaces, photographers may have limited positioning options, compelling them to use wide-angle lenses, which leads to increased distortion.
How to Correct Lens Distortion in Real Estate Photos

Automated Correction of Lens Distortion in Real Estate Photos Using Profiles in Lightroom
Adobe Lightroom provides powerful lens correction tools that enable easy adjustments for common distortions.
- Lens Profiles: Lightroom includes an extensive library of lens profiles for automatic distortion correction.
Steps to Apply Lens Profiles in Lightroom:
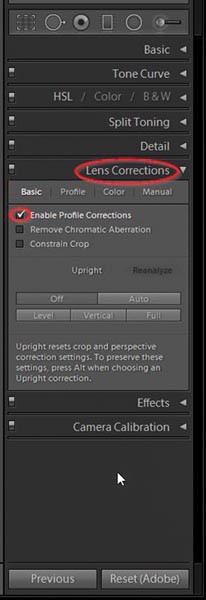
Load your image in Lightroom and navigate to the Develop module. In the Lens Corrections panel, enable Profile Corrections. Lightroom will detect the lens used and make adjustments to reduce barrel, pincushion, and mustache distortions for a more natural image.
Manual Correction Techniques in Lightroom
For finer adjustments, Lightroom’s manual correction features provide detailed control over distortion and perspective.
Steps for Manual Correction in Lightroom:
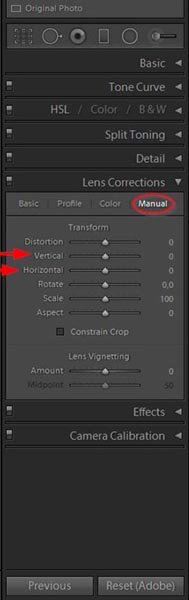
- In the Develop module, navigate to the Transform panel and select Manual.
- Use the Distortion slider to manually adjust for barrel or pincushion distortion.
- For keystone distortion, adjust the Vertical and Horizontal sliders to properly align the lines.
- Utilize the Aspect slider to ensure the image proportions appear natural.
Correcting Keystone Distortion with the Guided Upright Tool:
- Within the Transform panel, select the Guided option.
- Draw two vertical or horizontal lines along the distorted elements in the photo. Lightroom will automatically align these lines, effectively reducing keystone distortion.
Correction Techniques in Photoshop
Photoshop offers a range of tools for precise distortion correction, particularly for images that require meticulous adjustments.
- Using the Lens Correction Filter:
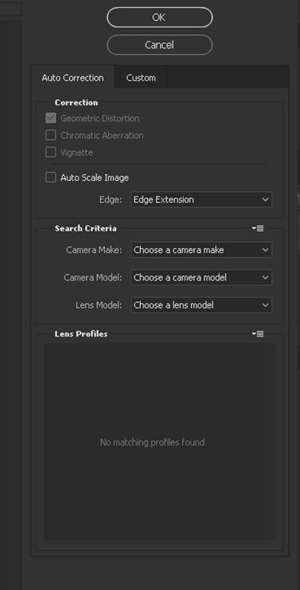
-
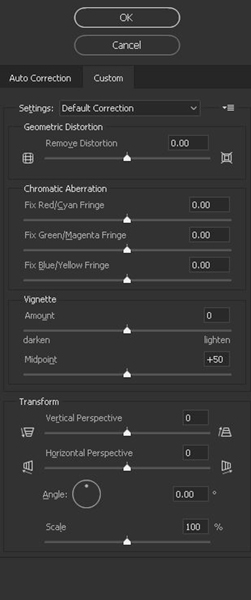
- Open your image and go to Filter > Lens Correction.
- In the Lens Correction window, select Auto Correction for Photoshop to automatically detect and apply the correct profile.
- For manual adjustments, navigate to the Custom tab and utilize sliders like Remove Distortion (for barrel or pincushion distortion) and Vertical Perspective (for keystone distortion).
- Using the Adaptive Wide Angle Filter for Extreme Distortions:
- Go to Filter > Adaptive Wide Angle.
- In the Adaptive Wide Angle panel, choose the Perspective or Auto option.
- Draw straight lines along elements that should appear straight, allowing Photoshop to automatically align them.
- Adjust settings like Scale and Focal Length as necessary.
- Correcting Keystone Distortion with the Transform Tool:
- Press Ctrl+T (Windows) or Cmd+T (Mac) to activate the Transform tool.
- Right-click and select Perspective or Distort.
- Drag the corners of the image to straighten lines and correct keystone distortion.
Tools and Software for Lens Distortion Correction
- Adobe Lightroom: Provides user-friendly, automated profile-based corrections along with manual options for enhanced control.
- Capture One: Features a variety of distortion corrections, especially beneficial for high-quality outputs.
- Specialty Software (e.g., Photomatix): Some HDR editing programs, like Photomatix, also include lens correction profiles that are helpful for real estate HDR edits.
Tips for Minimizing Distortion On-Site
- Use Built-in Camera Leveling: Most cameras come equipped with leveling tools to assist in achieving balanced shots.
- Framing Techniques: Keep the camera level with the horizon to avoid extreme angles and minimize perspective distortion.
- Consider Tilt-Shift Lenses: Tilt-shift lenses can effectively eliminate keystone distortion by maintaining straight lines without the need for digital corrections.
When to Consider Professional Editing Services
For high-volume listings or complex distortion issues, professional editing services can save valuable time while delivering consistent, high-quality results. Experienced editors utilize advanced tools and techniques to seamlessly correct distortion, ensuring that photos accurately reflect the property’s appeal.
Conclusion
Lens distortion in real estate photography can detract from the visual appeal of property images. By understanding the various types of distortion, their causes, and how to rectify them using tools like Lightroom and Photoshop, photographers can produce polished, professional real estate photos. For those seeking consistent, high-quality results, consider outsourcing distortion correction to skilled editors.
Alida Team specializes in providing professional real estate photo editing services designed to make property images shine and attract potential buyers. Our team of experts is well-versed in advanced techniques, including day-to-night conversions, lens distortion correction, HDR processing, and real estate video creation. We are dedicated to delivering high-quality, sharp, and engaging visuals that enhance every property listing. With our experienced editors and efficient workflow, Alida Team guarantees fast turnaround times and consistently outstanding results tailored to your real estate photography needs.
Contact us at photonews121@gmail.com to elevate your real estate photography with premium edits and polished results.